Sunday, December 11, 2016

Lemon Garlic Green Beans

 
Last week, I needed a quick vegetable to compliment the Buttermilk roast chicken recipe that I copied from Facebook 

Lemon Garlic Green Beans

2 Tbsp Butter
2 Tbsp Olive Oil
3 Cloves Garlic, minced
2 lb Green Beans, trimmed
Zest & Juice from 1 Lemon
1/4 Cup Walnuts, chopped
Salt & Pepper to taste 

Directions:
Melt butter with olive oil in a skillet over medium heat.  Add garlic & sauté for 1-2 minutes. Add the green beans to the pan and salt & pepper to taste.  Cook for 4-6 minutes stirring several times.  Add lemon zest and juice, cook for another 2 minutes.  Toss walnuts into pan, cook for an additional 3-4 minutes.  Enjoy!

Sunday, August 28, 2016

Tender Crispy Baked Chicken


I was in the mood for fried chicken, but I didn't have all the ingredients such as buttermilk.  I pulled out a couple of cook books and found a recipe that used sour cream and was baked instead of fried!i didn't have all the ingredients, but was able to make substitutions with my own end of spices and rice wine vinegar instead of lemon juice.  This recipe was super simple to prepare.  It would be a great weeknight option!  I hope you make this recipe and taste it for yourself!

Tender Crispy Baked Chicken:

1 cup sour cream
1 tbsp dried parsley
2 tbsp rice wine vinegar
1 tsp celery seed
2 tsp paprika
2 tsp Worcestershire sauce
2 cloves garlic, minced
1/2 tsp garlic salt
1/2 tsp salt
1/4 tsp pepper
4 skinless boneless chicken breasts 
2 cups bread crumbs
3 tbsp butter, melted

In a bowl, mix together the sour cream and all the other ingredients through the pepper.  Dip each chicken breast in the sour cream mixture and make sure each piece is well coated.  Place the costed chicken on a parchment paper covered baking sheet.  Refrigerate for 2-8 hours.  When you remove the chicken from the refridge, preheat the oven to 350*F.  Place the 2 cups of breadcrumbs on a shallow dish and dredge the chicken through them.  Place the chicken on a wire rack that is sitting inside of a foil covered backing sheet.  Bake the chicken for 45 minutes.  Melt the butter and drizzle over the chicken then return it to the oven for another 15 minutes.  When you remove the chicken from the oven, let it rest for 10 minutes prior to serving.

Saturday, June 25, 2016

A Summer Favorite: Teriyaki Flank Steak


It's summertime and the grillin' is easy! We grill 2-3 times per week during the summer.  It has a couple of great advantages. It keeps the kitchen cool plus my husband does the cooking!😎. 
Teriyaki steak is one of our favorite recipes from my mom.  It is as simple as can be to throw the meat into the marinade for 8 to 24 hours before grilling.  The marinade makes the meat tender and juicy! I pair the steak with twice baked potatoes and corn on the cob for a great company meal that allows you to be with your guests a not in the kitchen!  

I grilled the corn alongside the meat which was super simple.  If you want to try it, here's what you do:

Grilled Corn:
Peel back husks, but don't tear them off the ears.  Remove the silk. Cover the ears back up with the husks and soak in a large bowl of salt water for 29-25 minutes.  Dry the ears after removing from the water.  Place the ears on the grill over medium heat for 20 minutes.  Turn the ears every 5 minutes.  Brush with butter & season to taste before serving.  


Teriyaki Flank Steak:
1.5 lb flank steak
1 can beef consommé
1/3 cup soy sauce
4 tbsp brown sugar
Juice of 1 lime
1/2 cup green onions, sliced
1 1/2 tsp salt
1/2 tsp pepper
Garlic salt to taste

Directions:

Cut steak into 2-3 inch pieces.

Mix remaining ingredients in a sealable container or bag.  Add steak pieces and seal the container.  Place in the refrigerator at least 6 hours and up to 24 hours.  Remove container from refridge 30 minutes before grilling.  Grill over a medium-high heat for about 8 minutes per side or until desired level of done.  Enjoy!!

Sunday, June 5, 2016

Asparagus & Cheese Stuffed Chicken


As a mom in the technology age, I am trying out all the social media apps that are available.  I recently started on Snapchat (dssissons15).  I'm fumbling around trying to figure it out.  I think Ivd only added 3 or 4 things to my story snd of course they are good related!😊 on of the people I follow is Ree Drummond, the Pioneer Woman.  A couple of days ago, she posted a series of photos and videoS of her making a beautiful chicken dish.  It was a pan fried chicken cutlet with cheese melted over it!  I kept thinking about the thin chicken cutlets.  Yesterday as I was taking stock of the ingredients that I had on hand, I decided to make chicken.  I wanted to do cutlets, but since I had made French fries the night before, I didn't want to fry the chicken.  

I decided to instead of melt the cheese on the outside, I would stuff it into the cutlet with a bit of asparagus!  The asparagus was tender and yummy!  Another good veggie option would be pablano pepper if you wanted the dish to be a little spicier!  The hands on prep time was about 15 minutes and the bake time was 45 minutes.  I made stuffing & corn to go with the chicken so at the end, the plate was a bit monochromatic, but it was good! Hope you try this recipe & if you are Snapchat, look me up & we can start a foodie conversation!

Asparagus & Cheese Stuffed Chicken:


Ingredients:

4 boneless skinless chicken breasts
6-8 stalks of asparagus, trimmed
2 green onions, sliced w/green tops saved for garnish
8oz cream cheese, softened
1/2 cup cheddar cheese
1 tsp Salt, split 
1/2 tsp Pepper, split
1 tsp Creole seasoning, split 
1/2 stick of butter
1/2 lemon


Directions:

Preheat oven to 350*F.  In a medium bowl, mix together the cream cheese, cheddar cheese, 1/4 tsp pepper and a 1/2 tsp each salt & Creole seasoning.  Mix the white part of the green onion into the cheese mixture then set it aside.  Place a chicken breast between 2 pieces of plastic wrap and pound thin.  I used a meat mallet, but you could also use a rolling pin or even a heavy can.  Repeat the process until all 4 chicken breasts are thin cutlets.  Remove one side of the plastic wrap and spread a generous amount of cheese mixture on the chicken and then lay on the asparagus pieces.  Be sure not to take the cheese mixture all the way to the edge or you won't be able to roll up the cutlet.  Roll the cutlet so the sides meet and secure with toothpicks.  Place the stuffed cutlets into a greased casserole dish. Sprinkle the cutlets with the remaining seasoning. On the stove over medium heat melt the butter and jive from 1/2 a lemon.  Add seasoning to taste and then pour the mixture over the cutlets.  Bake for 45 minutes or until the juices run clear.  Let rest for 5 minutes before serving.  Enjoy!


Sunday, May 29, 2016

Almond Cake with Chocolate Fudge Frosting


I live in a small town south of Indianspolis and around here Memorial Day is synonymous with the Indianapolis 500!  Today is the 100th running of this great race!  So if you are a Hoosier, you are likely to be invited to a race party like the one we attended yesterday.  There are activities from formal balls to simple backyard BBQ's & everything in between! We went to a potluck BBQ full of saucy ribs and yummy salads.  My sister brought her great pasta salad which I wrote about last year in the entry about All Week Pasta Salad.  My mother brought a cold dessert that she calls "Robert Redford or Better than Sex".  I will post that recipe when I can get a copy from her.  She is making a snickers pie for tomorrow's picnic so I'm thinking I will do a post on summer desserts!

As it happens many times, I surfed through Pinterest for inspiration.  I found a great recipe by Brown Sugar which I tweaked a bit to make it super moist and tender!  I sifted all the dry ingredients before mixing which gives you a higher rising cake and I also cut back the sour cream.  This recipe was really quick and easy to make.  The frosting recipe makes more than enough and my sons enjoyed the sweet leftovers!  I hope the next time you need to take a dish to a picnic or BBQ, you give this cake a try!

Almond Cake with Chocolate Fudge Frosting


Ingredients:

2 sticks of butter
1 cup water
2 cups cake flour
2 cups sugar
2 eggs, beaten
1/4 cup sour cream
1 tsp salt
1 tsp baking powder
1/4 teaspoon baking soda
1 tsp almond extract

Frosting:
1 cup Sugar
1/2 cup unsweetened Cocoa powder, Sifted
1/2 cup Milk
4 tbsp Butter
2 tbsp Light Corn Syrup
4 cups Powdered Sugar, Sifted
2 tspVanilla Extract

Directions:
Preheat oven to 375*F.  Grease and flour a 9x13 glass dish and set aside. In a large bowl, sift together the cake flour, salt, baking soda and baking powder.  In a large saucepan, add the water and butter which should be cut into small cubes to allow even melting. Over medium heat, bring the mixture to a boil and stir frequently.  Remove from the heat when the butter is completely melted.  Add the warm butter mixture to a mixing bowl. With your mixer on low, slowly add the flour mixture, sour cream, sugar and eggs.  When the batter is thoroughly mixed, add the teaspoon of almond extract and mix the batter until all is combined.  Pour the mixture into the prepared 9x13 dish.  Gently tap the dish on the counter a few times to have any sir rise to the top.  Place the cake in the preheated oven and bake for 20-24 minutes.  Test the cake with a toothpick or small fork poked in the middle.  If the utensil comes out clean then the cake is ready to leave the oven.  Let cool for an hour before frosting. 

When the cake is ready for the frosting, combine the sugar and cocoa in a saucepan.  Whisk in the milk, butter and corn syrup.  Place the sauce pan over medium heat and stir continuously until the butter is melted and the chocolate mixture looks smooth.  Remove from the heat and slowly stir in the sifted powdere sugar.  When all the powdered sugar is combined, spread mixture quickly over the cake.  Let the frosting cool before serving.  Enjoy! 


Sunday, April 3, 2016

Kitchen Takeover: Father-in-Law Edition!


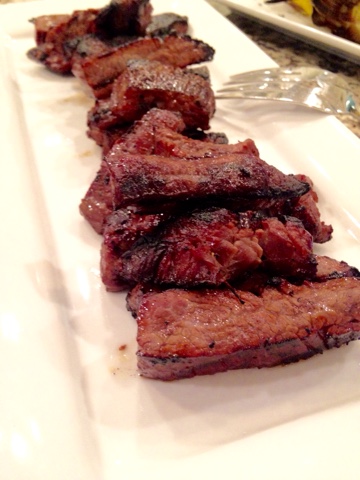
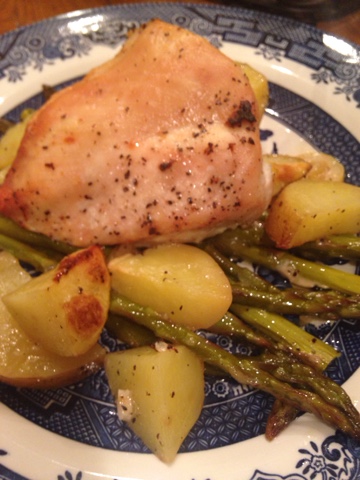
This past week, we had my in-laws visiting us.  It is always a treat to have Nana & Grandpop here! They spoil all of us!  They spent the week entertaining the kids, helping us around the house & of course feeding us!  When they visit, I can always count on my father-in-law, Jim doing some of the cooking.  That's him in the picture above.  He is not a big fan of social media, but he has given me permission to make this post! This trip, he has made chili, potato salad, hamburger soup and jalapeño deviled eggs!! It was so great to come home from work & walk into the aroma of some delicious cooking!  It made me feel like a kid again coming home after school to all my mom's wonderful meals!  

Lucky for me, he left all the recipes so I could make them myself and share them with you!  
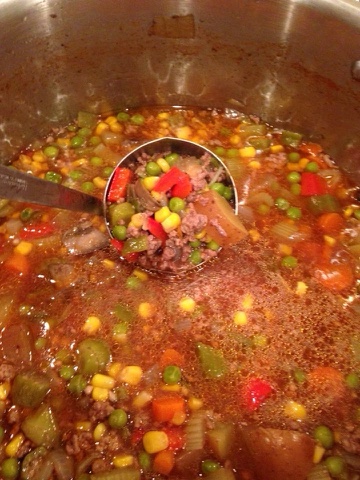
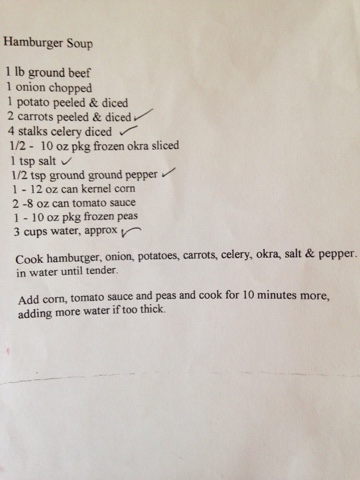

Hamburger Soup:
(Serves 8)


Jalapeño Deviled Eggs:


Ingredients:
12 hard cooked eggs, peeled
2 tbsp green onions, diced
2 tbsp cilantro, chopped
1 small jalapeño pepper, seeded and diced
1/2 cup mayonnaise 
2 tsp yellow mustard
1 tsp salt
Chili powder for garnish
1 small jalapeño pepper, sliced & seeded for garnish

Directions:

Slice all the eggs lengthwise.  Careful remove the yolks to a bowl and set the whites aside.  Mash the yolks and then add the next six ingredients to the bowl.  Mix well.  Spoon the yolk mixture into the halved whites.  Sprinkle chili powder over all as desired and garnish with a slice of jalapeño!

Light Potato Salad:
(Forgot to take a picture!)

Ingredients:
2.5 lbs baby red potatoes, quartered with skins on
2 tbsp apple cider vinegar
1/2 cup buttermilk
1/4 cup reduced fat sour cream
1/4 cup reduced fat mayonnaise
1 tbsp country Dijon mustard
2 carrots, grated
1/2 cup celery, chopped
1/2cup radishes, sliced thin
1/4 cup parsley, rough chopped
1 tbsp lemon zest
1 clove garlic, minced
Salt and pepper to taste

Directions:

Boil the potatoes for 7-10 minutes until tender.  Drain the potatoes and arrange on a wax paper lined baking sheet to cool completely (~30 minutes).  Whisk together the vinegar and next 4 ingredients to make the dressing. In a large bowl, gently toss together the potatoes, dressing and the remaining ingredients.  Salt and pepper to taste.  Cover and chill for at least 2 hours before serving.  The longer it chills, the more the flavors deepen so this is a great make ahead dish!


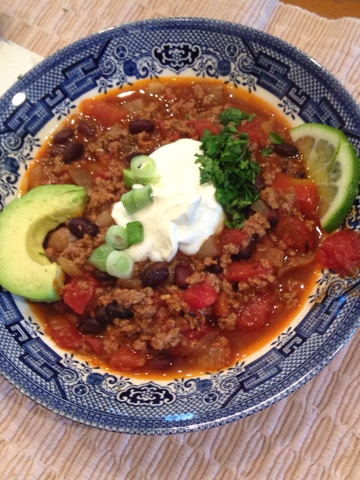
Beef and Black Bean Chili:


Ingredients:
3 tsp olive oil
1.5 lbs ground sirloin
1 tsp kosher salt
1 lg yellow onion, chopped
3 cloves garlic, minced
1 tbsp ground cumin
1/2 tsp ground cinnamon
1 tsp ground oregano
1.5 cups reduced sodium chicken broth
1 cup water
1 can (28oz) crushed fire roasted tomatoes, undrained
2 tbsp tomato paste
2 tbsp honey
1 can (15oz) black beans, rinsed & drained
1 tbsp lime juice

Garnish Choices:
 Lime slices
Avocado, peeled & thinly sliced
Sour cream
Cheddar cheese
Green onions 
Cilantro, minced

Directions:

Heat a teaspoon of the oil in a large pot.  Place the ground beef into the heated oil and brown for 5-7minutes until no longer pink.  Using a slotted spoon, transfer the beef to a bowl and set aside. Drain the liquid from the pot and add the remaining 2 teaspoons of oil.  Add the onion and sauté until soft and translucent (3-4 minutes).  Add the minced garlic and sauté another minute.  Stir in the chili powder, cumin and oregano. Cook for a minute to release the spices.  Add the beef back to the pot along with the chicken broth, water, fire roasted tomatoes, tomato paste and honey.  Reduce the heat to low, cover and simmer for 1 hour.  Occasionally stir.  5 minutes before serving, add the beans and lime juice.  Plate in soup bowls and allow everyone to add the garnishes of their choice.

I hope you all try these great recipes!  We really ❤️ them!  Thanks, Pop!  We can't wait for your next visit!!

Sunday, March 13, 2016

One Dish Dinner: Lemon Garlic Chicken


The busiest time of day in this household is generally between 4-6pm.  During that time, I need to supervise homework, complete household chores left from before work, make sure we have everything we need for evening activities and all the while preparing, eating and cleaning up dinner! The challenge is always how to get a good nutritious meal on the table without creating a mountain of clean up work!  That's where one dish meals come in! I love the quick prep time and minimal mess of these types of meals!  For this particular dish, chicken is so versatile, you can pair whatever veggies you like with it.  I chose potatoes and asparagus, but it would be just as great with turnips and green beans!  The total prep time is about 20 minutes which is mostly cleaning and cutting the veggies, lemon and garlic. Putting the dish together takes less than 5 minutes, it is just layering process.


Lemon Garlic Chicken:

Ingredients:

4 boneless skinless chicken breasts
2 lemons
4 cloves garlic, minced
6 potatoes, quartered 
1 bunch asparagus, trimmed
4 tbsp olive oil
1 tsp kosher salt
1/2 tsp black pepper


Directions:

Preheat oven to 350*F. Thinly slice 1 1/2 lemons.  Reserve a half lemon for the juice.  Coat a 9x13 casserole dish with 1 tbsp of olive oil and then place the sliced lemon in a single layer in the dish.  In a bowl, mixed together 3 tbsp of oil with the juice of the remaining lemon half.  Add the minced garlic, salt and pepper and mix well.  Gently toss the asparagus in the lemon garlic mixture and then place in an even layer over the lemon slices in the 9x13.  Repeat the same process with the potatoes and chicken.  Bake in the oven for 45 minutes.  Let dish rest for 5 minutes out of the oven before serving!

Wednesday, March 9, 2016

Bacon Wrapped Pork Roast with Mustard Duck Sauce Glaze


When I go grocery shopping, I make a meal plan and vow that I will stick to my list.  Inevitably, I end up buying extra meat that is on sale and I have no plan of what to do with it.  This week, I brought home a lovely small pork roast.  When I was ready to use it, I rummaged through my fridge and pantry for things to go with it and came up with bacon!  I looked up recipes for this combo and most had some sort of glaze.  Since this wasn't a meal that I planned in advance, I didn't have all the ingredients for any one specific recipe so I improvised. Instead of honey, preserves or chutney, I used packets of duck sauce that I had left over from Chinese takeout.  If you're like me, you always have extra takeout condiments floating around in your refridge!  Sean and the boys enjoyed my improv & I hope you will too!


Bacon Wrapped Pork Roast with Mustard Duck Ssice Glaze:

Ingredients:
1-2lb pork roast
4-6 slices of bacon
3 tbsp brown sugar
1 tsp garlic salt
1/2 tsp black pepper
1/4 tsp cayenne pepper
2 tbsp country brown mustard
4 packets duck sauce
1 packet hot mustard
4 tbsp oil split in half

Directions:
Preheat oven to 325*F.  In a small bowl, mix together the brown sugar, garlic salt and the two peppers.  Rub this mixture evenly over the pork roast.  Wrap the roast in the slices of uncooked bacon and fasten with toothpicks.  Inserting the toothpicks on the side of the roast works best.  Heat 2 tbsp of the oil in an oven proof pan over medium heat on the stovetop.  Place the bacon wrapped roast in the pan and sear it on all sides about 8 minutes per side.  While the roast is searing, mix together the remaining oil, brown mustard, hot mustard, and duck sauce.  After the roast has been browned, remove the pan from the heat.  Brush the mustard duck sauce on the roast and place the pan in the oven.  Cook for 45 minutes to an hour. The roast should have an internal temperature between 150-160*F.  After you remove the roast from the oven, let it rest for 10-15 minutes before slicing.